Example Three – Working with Dates and Times
In the previous example, we used the Date macros to default a date to the current date, but you can do more than just set the current date. So, for this example, we will look at some of the different ways you can manipulate dates and times using the Date, Time, and Math Macros. Including the following:
- Custom date/time formatting
- Date/time math for calculating past or future dates
So let’s take a look at some of this functionality. In this scenario, we are sending out a time-sensitive email where someone needs to respond in 15 days from the day the email was sent out. As in other examples, create a new snippet and we will begin from there.
- Give the snippet and name. You can either use Plain Text or Formatted Text, Pictures, either works.
- In the snippet section, use the below text. Yes, it is a bit contrived, but I want to focus on showing you how to use the macros and not how to write sales copy.
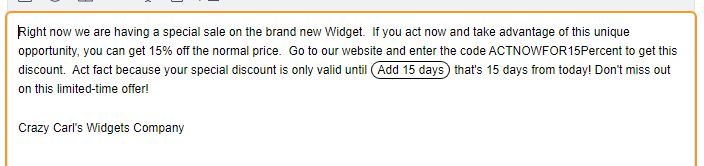
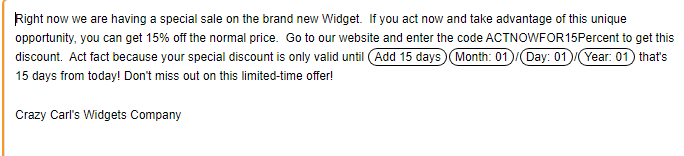
Right now we are having a special sale on the brand-new Widget. If you act now and take advantage of this unique opportunity, you can get 15% off the normal price. Go to our website and enter the code ACTNOWFOR15Percent to get this discount. Act fast because your special discount is only valid until [CalcDate] that’s 15 days from today! Don’t miss out on this limited-time offer!
Crazy Carl’s Widgets Company
*In business terminology, a “widget” is a generic term for any product or item.
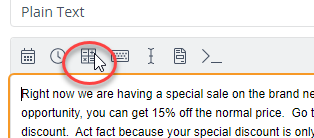
- Now we are going to replace [CalcDate]. Delete the text and leave your cursor there. With the mouse click on the Date/Time Math Macro button.
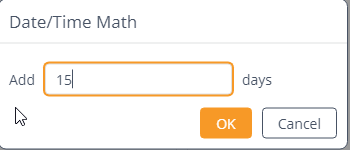
- Click Add days and then a new window will appear asking how many you want to add. Type 15 and then click OK.
- You will now see that “Add 15 days” has been added to the snippet. What this does is that any Date or Time macro added after this will be modified by this Date/Time macro. Which in our case is 15 days. NOTE: Any Date/Time macro affects all subsequent Date or Time macros, so you need to use “Reset Date Adjustment” to reset the time to the current date and time. This example won’t need this functionality, but you may in your own snippets. Ok, so now the snippet should look like this.
- Next, we want to show a date, so click on the Date macro button.
- You should see different Date parts and different formats. I want to use month/day/year, using two digits for each. So, I will first select Month: 01. Then type a forward slash “/”, followed by Day: 01, another forward slash, followed finally by Year: 01. Your snippet should now look like this.
- If you wanted to add a time you could. Those macros are to the right of the date macros. It gives you the ability to select 12 or 24 hr formatting.
- Run the snippet and you should see that the day shown is 15 days from today.
Need more flexibility with the date and time, you can use the “Unicode Date Format” in the Date/Time math Macros. Selecting it will bring up a window where you can add a custom format, based on the Unicode Date Format Patterns (find them here – https://unicode.org/reports/tr35/tr35-dates.html#Date_Format_Patterns). For example, if you entered QQQyyyy it would display the current quarter and year. I can’t cover all the different formats available, but it is worth taking a look if you are interested.
Right beside the date and time macros in the editor you have the keyboard and cursor macros. While they may seem to not be useful, they are really handy when you use them in the context of other programs. So, you could create a snippet that fills out the subject line and then jumps down to fill out the email body. Let’s take a closer look at how we can use these macros in Example 4 – Keyboard and Cursor Macros.
Ready to Take the Next Step?
If you found this post helpful, don’t miss out on the rest of the series. Explore the other posts for more insights and strategies. And if you’re looking to apply these ideas to your own business, let’s connect and discuss how I can help you achieve your goals.
- Example 1 – Simplifying Boilerplate Text
- Example 2 – How to Prompt Users for Input
- Example 4 – How to Automate Keyboard and Cursor Actions
- Example 5 – Making Snippets Interactive with Fill-ins
- Example 6 – How to Reuse Common Text in Multiple Snippets