Practical Automation – Automating Document Delivery with Calendly and Make.com
In today’s fast-paced business environment, efficiency is key. One area where many professionals struggle is the management of pre-meeting tasks, particularly sending out necessary documents to attendees. This process, while crucial, can be time-consuming and prone to human error when done manually. In this post, we’ll explore how to leverage the power of automation to solve this common challenge.
The Scenario
For this tutorial, we’ll step into the shoes of a Financial Planner who needs to streamline their prospecting process. Our Financial Planner faces two main challenges:
- Sending out disclosure documents to potential clients who schedule a meeting through Calendly.
- Maintaining an audit trail of who received the documents and when they were sent.
To address these needs, we’ll create an automation that accomplishes the following:
- Uses Calendly to capture meeting requests
- Saves client information and meeting details to a Google Sheet for record-keeping
- Retrieves disclosure documents from Google Drive
- Sends an email with the documents attached using Gmail
- Updates the Google Sheet with the date and time the documents were sent
This scenario is common not just for Financial Planners, but for many professionals who need to send out standardized documents before initial consultations or meetings. We’ll walk you through creating a practical Make.com (formerly Integromat) workflow that integrates seamlessly with Calendly to automate the document sending process. By implementing this system, you’ll be able to:
- Automatically send relevant documents to participants as soon as they schedule a meeting
- Reduce your administrative workload, freeing up time for more important tasks
- Ensure consistency in document delivery, eliminating the risk of forgotten or delayed sends
- Improve the attendee experience by providing timely information
- Track document deliveries effortlessly through automated record-keeping
Whether you’re a consultant sending out client agreements, a recruiter distributing job descriptions, or a salesperson sharing product information, this automation can significantly streamline your workflow. Let’s dive in and discover how to set up this powerful time-saving tool.
Prerequisites
Before we begin the tutorial, make sure you have the following set up:
- Make.com Account: Sign up for a free account at Make.com if you haven’t already. Familiarize yourself with the basic interface.
- Calendly Account: Ensure you have an active Calendly account with at least one event type created.
- Google Account: You’ll need a Google account to use Google Sheets and Gmail. If you don’t have one, create it at Google.com.
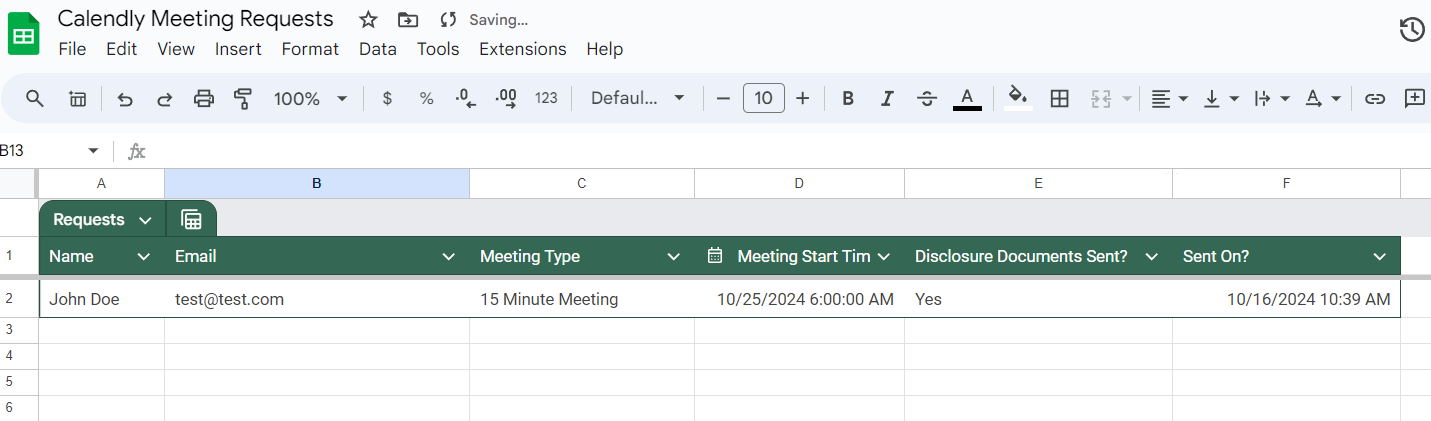
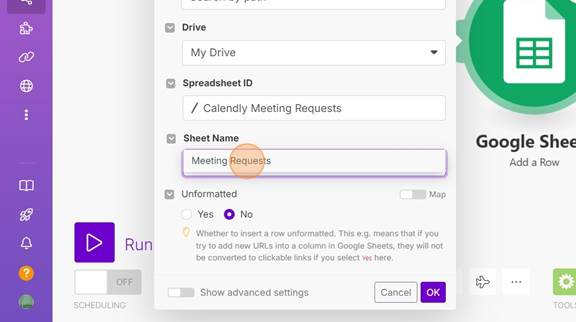
- Google Sheet Setup: Create a new Google Sheet with the following columns:
- Name
- Meeting Type
- Meeting Start Time
- Disclosure Documents Sent?
- Sent On?
Name this sheet “Meeting Requests” or something similar that you’ll remember. It should look like the below image.
- Google Drive Folder: Create a folder in your Google Drive to store the disclosure documents you want to send automatically. Upload all relevant documents to this folder. It should be a folder with no other files in it, outside the ones you want to send.
- Gmail: Ensure you have access to send emails through your Gmail account.
With these prerequisites in place, you’re ready to begin creating your automation workflow. In the following steps, we’ll guide you through the process of connecting these tools to create a seamless document delivery system.
Here is a quick flow outline.

Integrate Calendly With Google Sheets and Drive
Creating the Scenario in Make
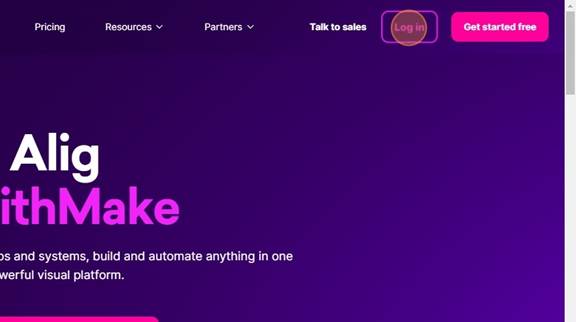
To get started, navigate to Make.
1. Once on the site click “Log in”
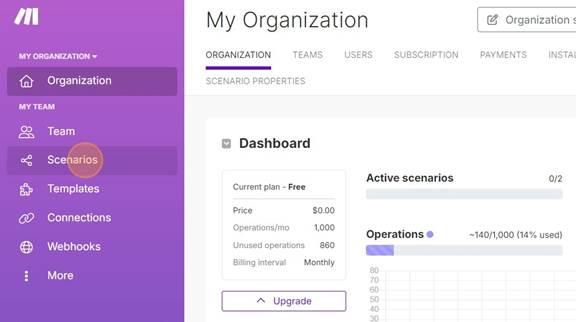
2. Make has the concept of scenarios, which encapsulate a series of actions called modules. Now, this is a rather simplistic definition, but this is a demonstration using Make and not a guide to Make. If you want a more detailed explanation, I would go here. For now, let’s click on the scenarios link in the side bar.
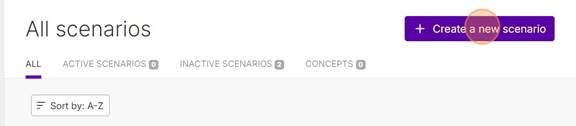
3. Next, lick “Create a new scenario”
First Module – Create the Connection to Calendly
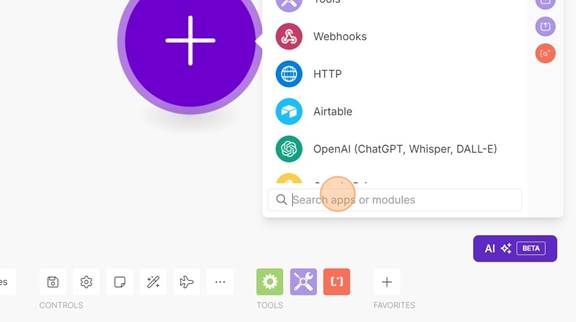
1. You will now find your self in the edit scenario screen, with a single circle sitting in the center with a window showing different modules. This is where we set the event that will trigger our scenario. For use this will be Calendly. So, you can either scroll through the list of modules or you can click on the box with a magnifying glass in it. Let’s click there for this walkthrough.
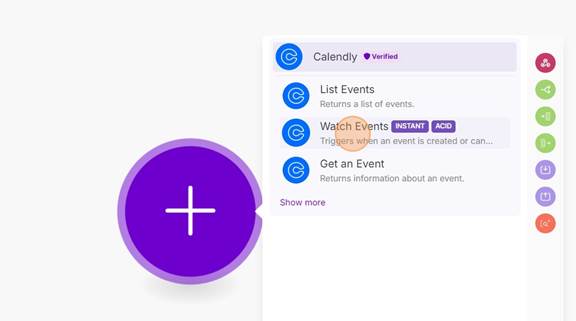
2. Type calendly and you should see a list of different events for Calendly. Click on Watch Events.
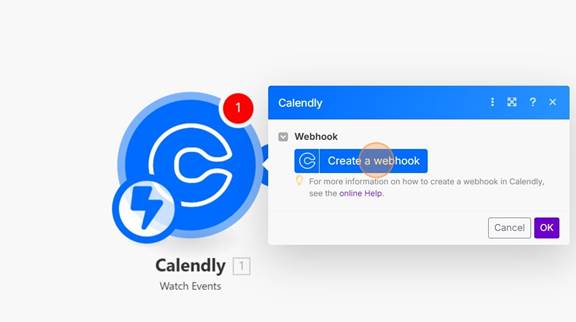
3. This will now change the purple circle with one for Calendly. If you don’t have a connection set up for Calendly, you will need to do that next. After that is done we will want to create a webhook, which is how Calendly will alert Make that we have a new event created in Calendly. A webhook is a way for external services to send real-time notifications or data to your Make scenario, triggering it to run automatically when specific events occur in the connected application. So let’s click Create a webhook.
8. Now, we need to select which events we want to have sent to us. In this case, we only want invitee created since we are only worried about sending disclosure documents to those setting up a meeting. So because of that let’s select Invitee Created.
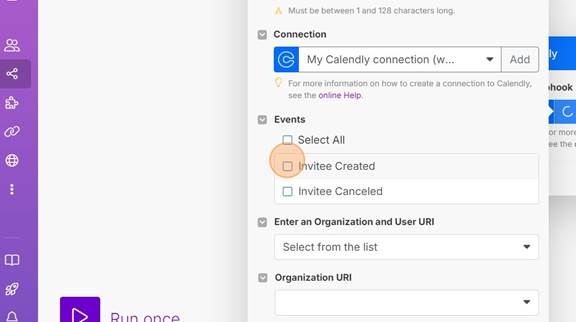
9. We now need to then select the organization we want to get the events from. Click on the drop-down under Organization URI and select the URL for your organization.
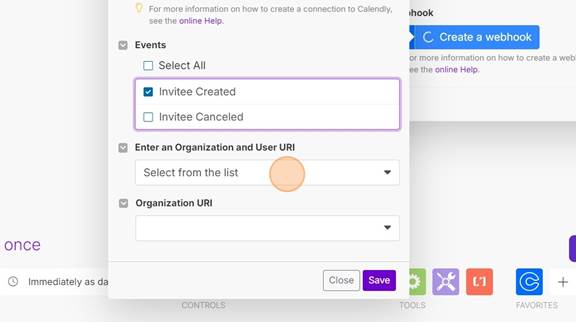
10. Now we need to select the Calendly user we want to get the events.
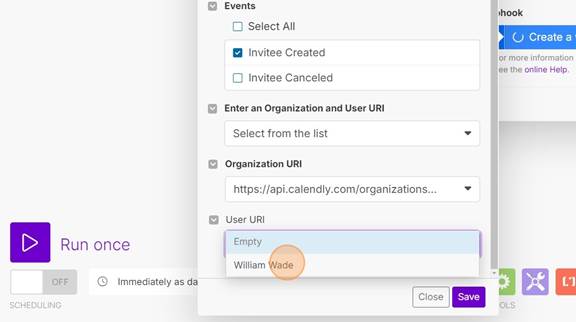
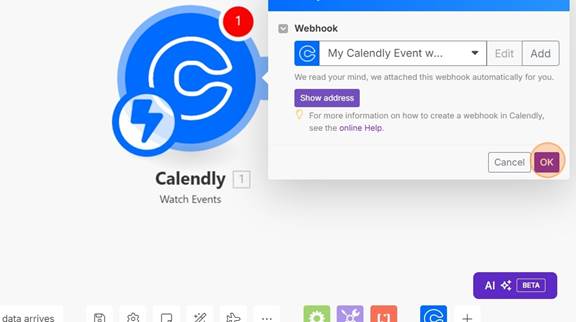
11. Once you are done click Save.

12. Click OK.
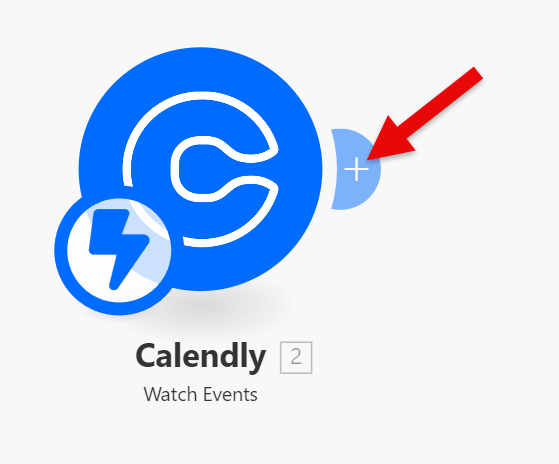
Now, we need to select another module. For this scenario, we are going to update a Google sheet with the invitee information. You should already have a sheet created, but if not review the prerequisites in the beginning of this post and then come back.
Adding a New Module – Inserting Data into a Google Sheet
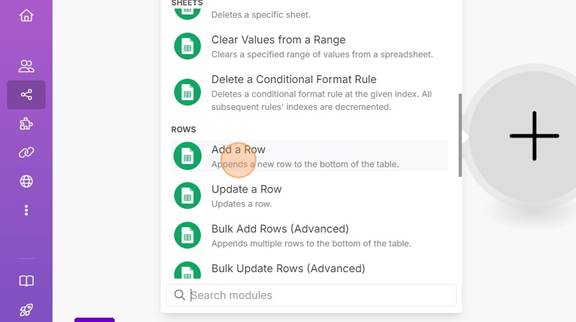
1. Now we need to click on the + symbol to add another module.
2. Look for Google sheets and click on it.
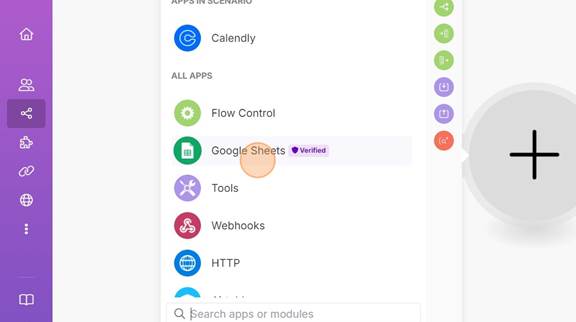
3. You should now see a list of actions you can take with Google Sheets. Look for Add a Row and click on it.
4. A new window will show up. We need to click on the Click here to choose file.
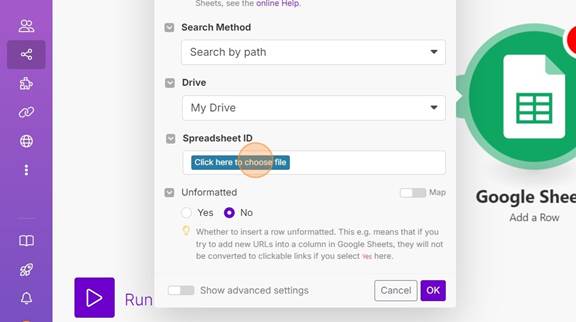
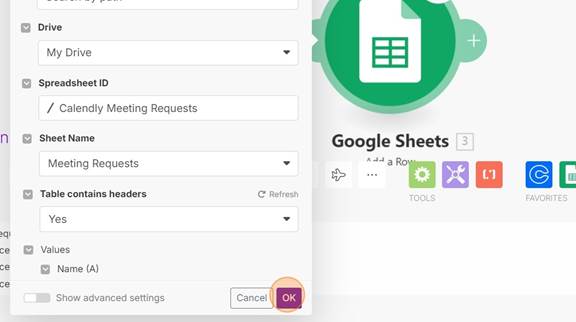
5. Select the Google sheet you created. If you are not sure where the sheet is, you can use the box with a magnifying glass to search for it.
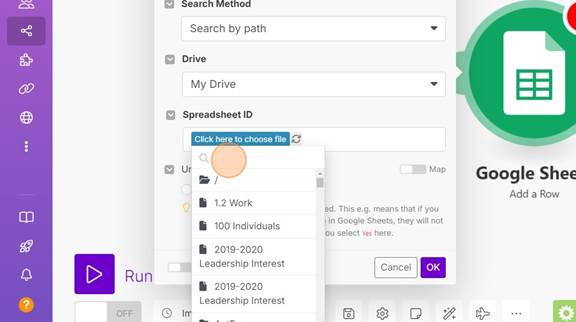
6. Click on the Google Sheet once you find it. Mine was called Calendly Meeting Requests.
7. Next, click on the drop down for Sheet and select the name you created in your Google Sheet. I called mine Meeting Requests and I select that.
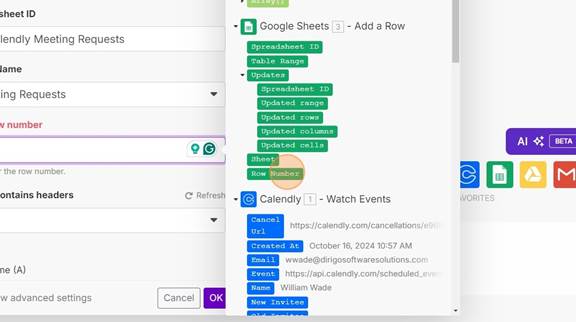
8. Once you select that, the window should update and then show you column names. If you don’t see it, you might need check that the option of Table contains headers should be Yes. Below is how my window looked once it updated. Now we need to set the values from the Calendly module, such as the name of the invitee, their email, etc… So, let’s start by connecting the invitee name to the same column in the sheet. Click in the Name textbox.
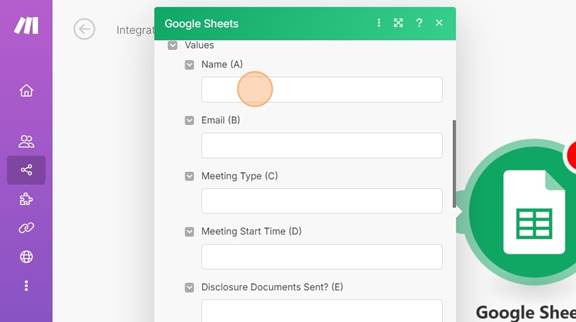
9. You will see a list of the data from the previous module(s) in a sidebar. Click on name to select it and fill that field.
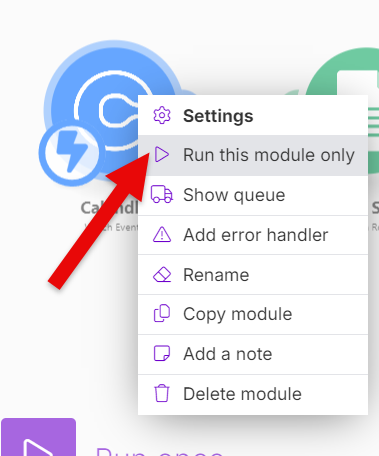
NOTE: You might not see all the fields from Calendly, so in those cases you can right click on the Calendly module and select “Run this module only.” Then you just need to set up an appointment in Calendly and it will then return the result to your Make scenario. You will see a window pop-up that will show you the data you got from Calendly for the new appointment.
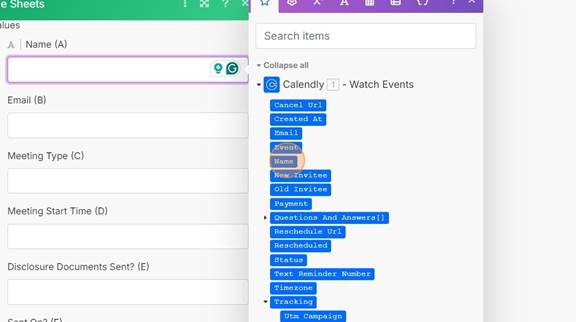
Below is how the screen should look when you click in the Name textbox.
10. You will now see the name value in the Name field.
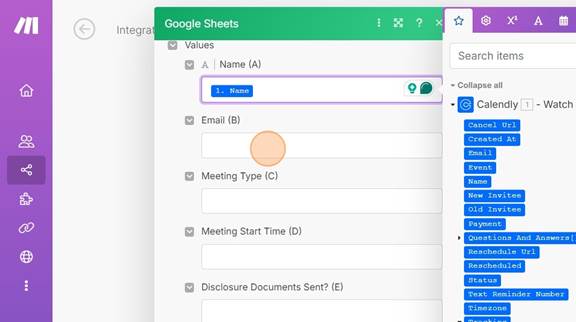
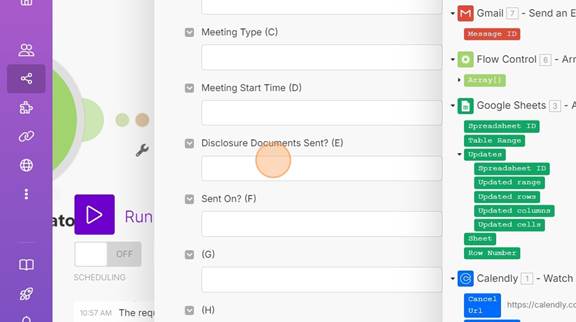
11. Repeat this for the other fields, excluding Disclosure Documents Sent? and Sent On? We will update these fields later. You should also exclude any other field that has just a letter as they are just additional columns from the spreadsheet that could be in use, but not in our scenario.
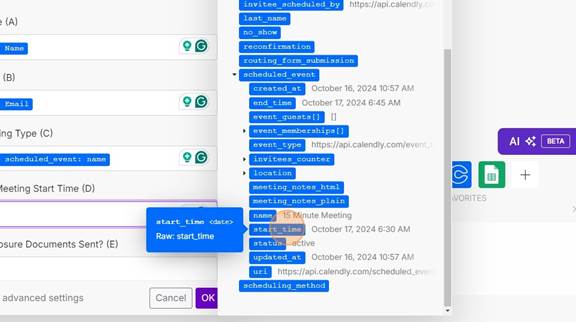
12. Email will be easy to find, but the value for Meeting Type is not as clear at first glace. It is under scheduled_event in the sidebar. So you will need to click on the drop down icon and then look for name and select it. Not the most intuitive as there is now multiple “name” fields, but that is how Calendly set it up.

13. This is also where you will find the meeting time. We only wanted the meeting start time so I click start_time for Meeting Start Time.
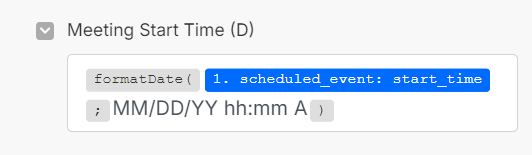
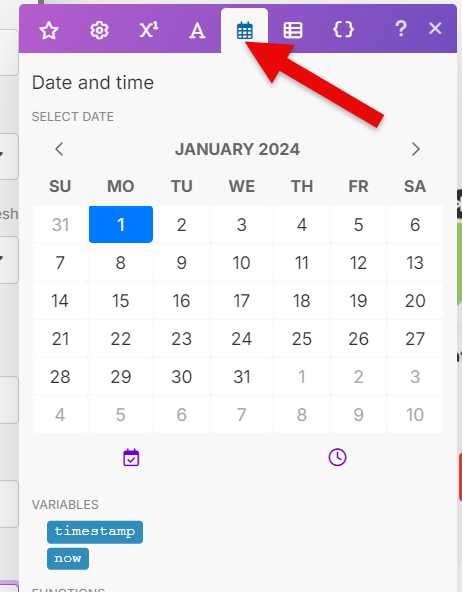
14. Now, we are going to want to format the start time and date, to make it easier to read. To do this we are going to use built-in functions to handle it. So we are going to surround the start_time with some code. Click at the beginning of the textbox and type in formatDate, followed by a open parenthesis (. Now move to the end of the textbox, after start_time and type a semicolon ; followed by this MM/DD/YY hh:mm A and a close parenthesis ). It should look like the image below when you are done. You can go here to see more information on how this function works, but it is just formatting the date.
15. Ok, we have finished setting up adding a new row to our Google Sheet. Click OK and let’s add the next module.
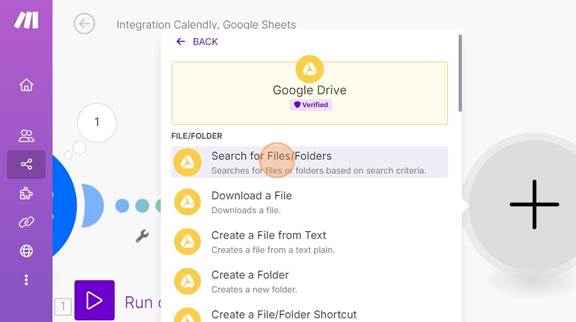
Getting the Disclosure Documents List from Google Drive
1. Add another module and search for Google Drive. Once you find it click on it.
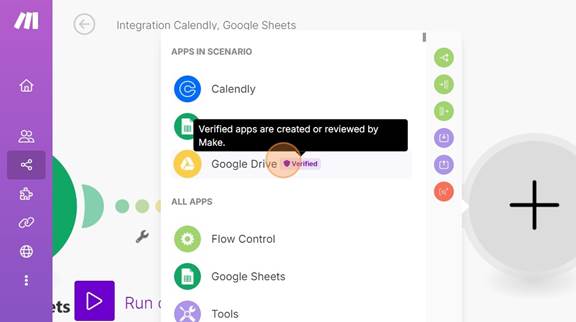
2. Next, we want to select Search for Files/Folders. This is going to allow us to send out all the disclosure files from a selected directory versus having to hard code it. So, it you need to add, remove, or change files you won’t need to update this scenario.
3. Click Click here to choose folder. Select the folder you have your disclosure documents. To avoid having to add filters, I have a dedicated folder that only has the disclosure documents.
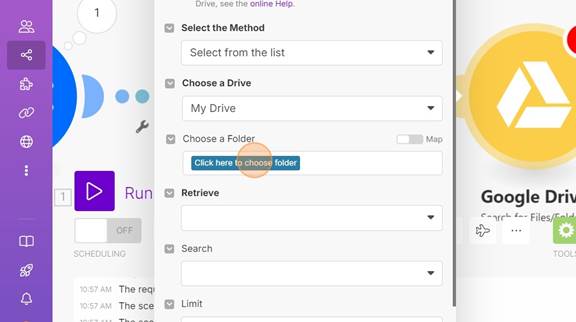
4. Under retrieve select, click files. This way we only get the files and nothing else.
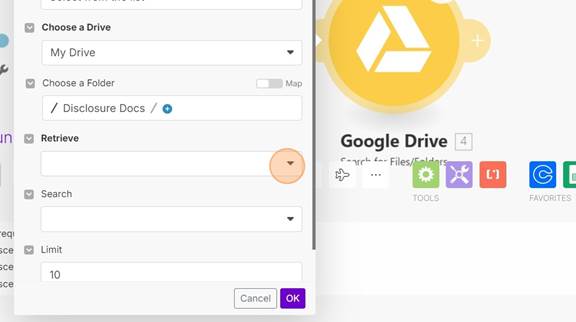
5. We don’t need more than 10 files or to filter our files, so we can just click OK and move on to adding the next module.

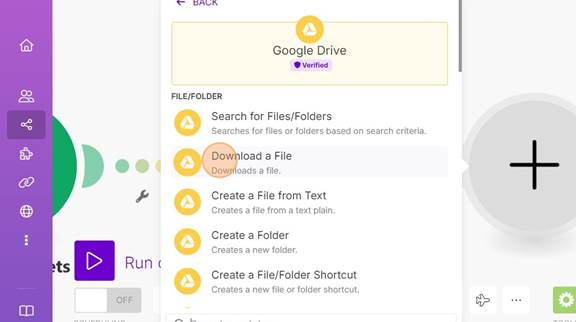
Downloading the Files from Google Drive
1. We are going to use the Google Drive module again, but this time we are going to select Download a File. We need to do this so we have the file data to add as attachments for our email to the invitee. The search module only got us the file ids for the disclosure documents.
2. When the module window pops up, we are going to select the Enter a File ID textbox.
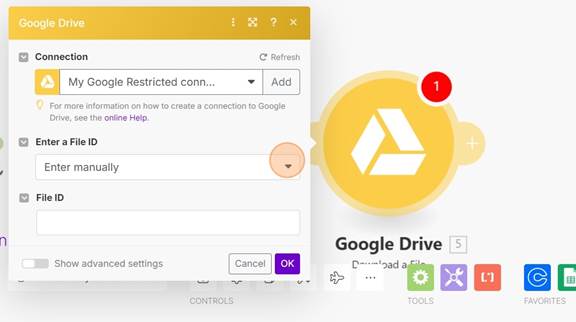
3. The sidebar will pop up, look for the previous step where we search for files and look for File ID and then click it. What this is doing is telling Make to use the resulting file id from the files we found in the previous step and then download them.
4. We are done, so click OK.
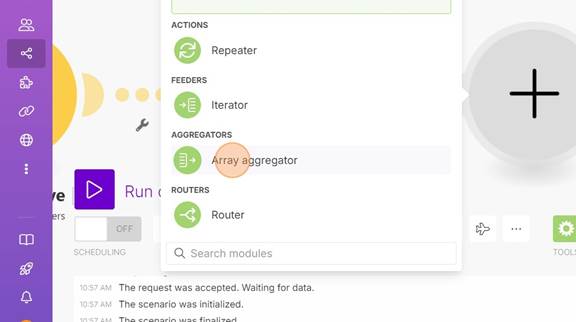
Consolidating the File Information using the Array Aggregation Module
1. Add another module and look for “Flow Control”. Click on it.
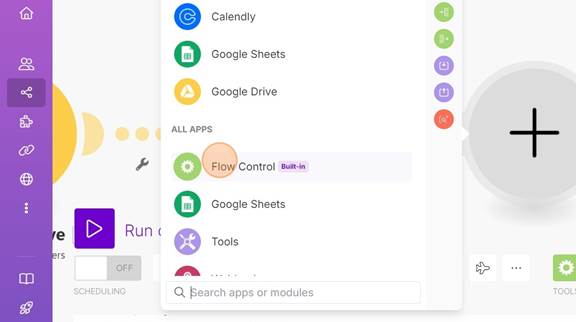
2. We then want to select Array aggregator.
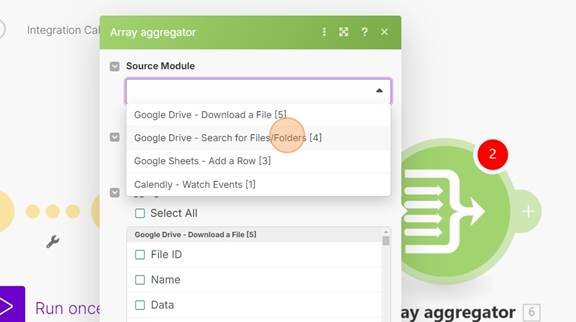
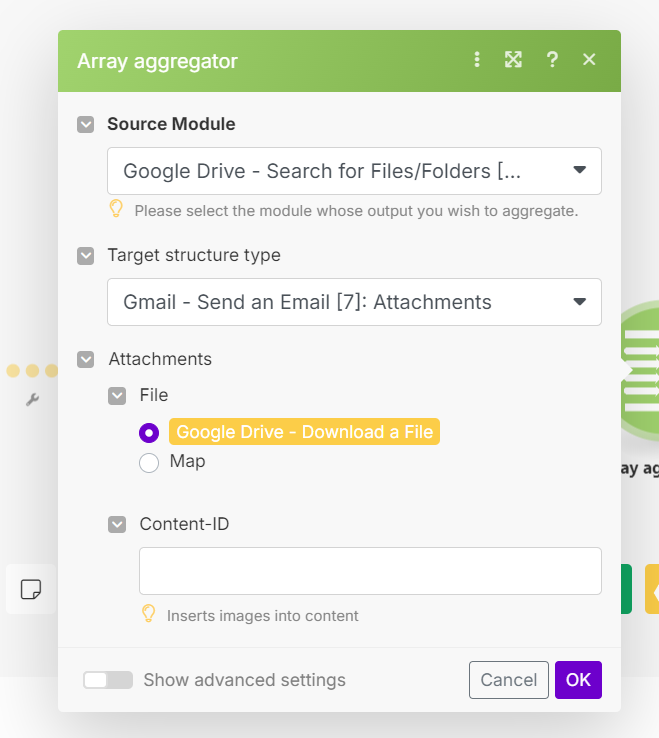
3. What we are doing here is taking the results from the two previous modules and consolidating them in a way GMail can use for attachments. Under Source Module select the Search for Files/Folders module, not the Download a File module. Otherwise you will get an email per attachment versus having the attachments all in one email.
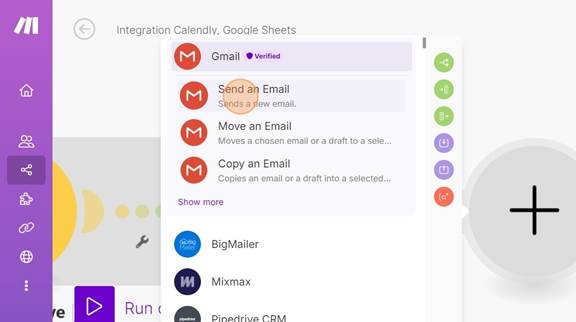
4. Now we need to set the structure type for the JSON object we are creating. We want to use one specific for GMail, but we need to add the GMail module before we can do that. So, for now let’s click OK and add the GMail module. The select Send an Email.
5. Now, that we have added the GMail module we need to return to our previous module Array aggregator to finish it up. Click ok and then click on the Array aggregator module.
6. Under Target structure type you should now see a new structure type Attachments under Gmail – Send an Email. Select it.
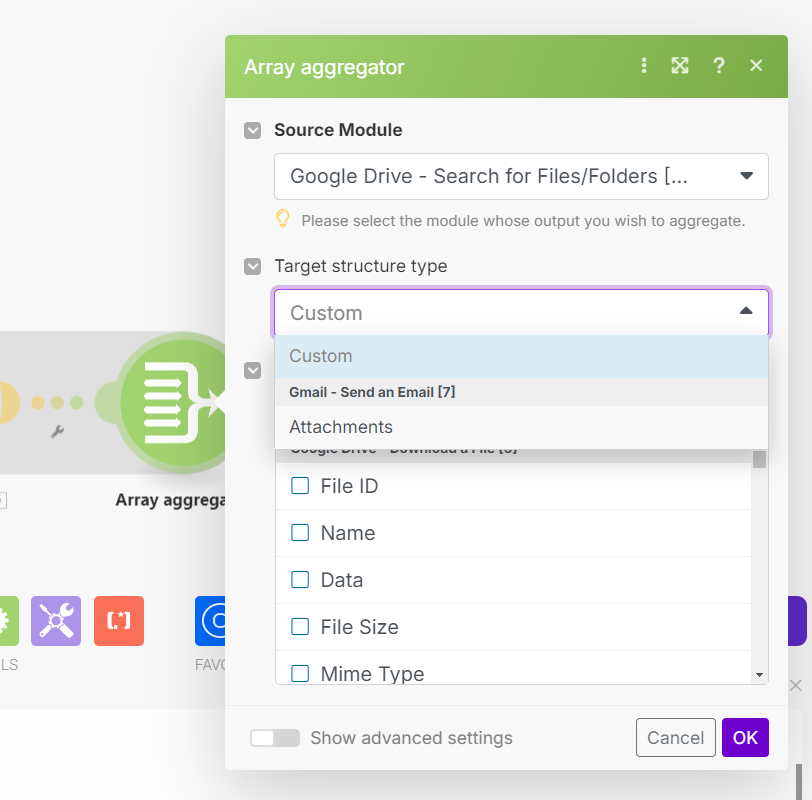
7. The screen should update and you should see that it has Attachments with File mapped to Google Drive – Download a File. So, now we have mapped the disclosure documents into a format the GMail module understands, so we can now go to the GMail module to work on it and finish it up. We are done with this module, so click OK.
Emailing the Disclosure Documents using GMail
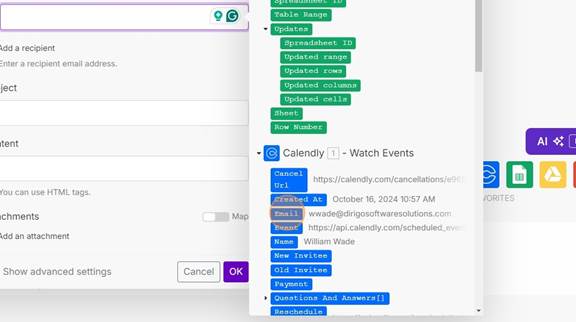
1. Go back to the GMail module and click on it. First things first, we need to select who we want to send the email to. Click on Add a recipient.

2. The sidebar will appear. Scroll down to the original data from the Calendly module and select Email from the list. This will select the invitees email which we want to use to send the disclosure documents.
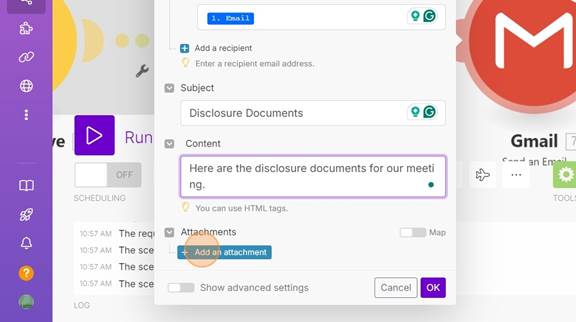
3. Next, put in a subject line for the email. I used Disclosure Documents.

4. Next, set the content for the body of the email. I put something simple, but obviously this should be more detailed. You can just use plain text or use HTML tags. HTML tags will allow you to better present and format the text.

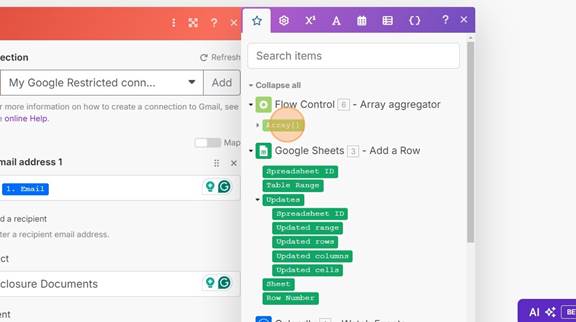
5. Next, click Add an attachment. Here we are going to bring in the array data from the previous step to add as attachments.
6. Next, click on the Map toggle.
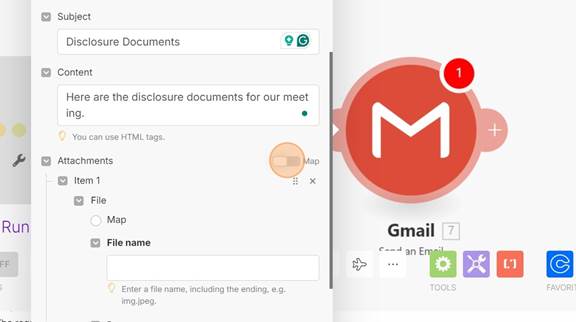
7. Then click in the Attachments textbox.
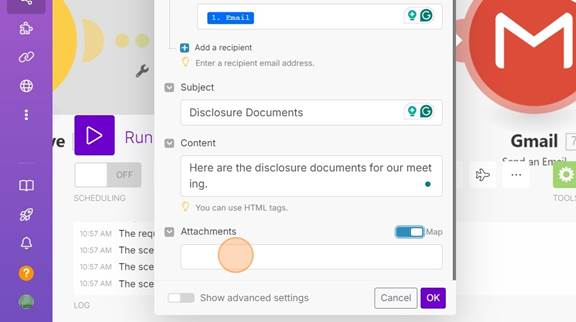
8. Now, you need to select “Array[]” from under the Flow Control section. This now will map all the files we designated from the previous steps and add them as attachments to our email. Click “OK” to move on to the next step.
Update the Google Sheet with the When the Email was Sent
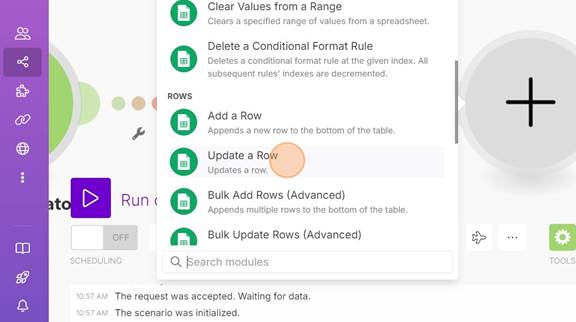
1. The final step is to update our Google Sheet with the time and date for when we sent the disclosure documents. Select Google Sheets and Update a Row.
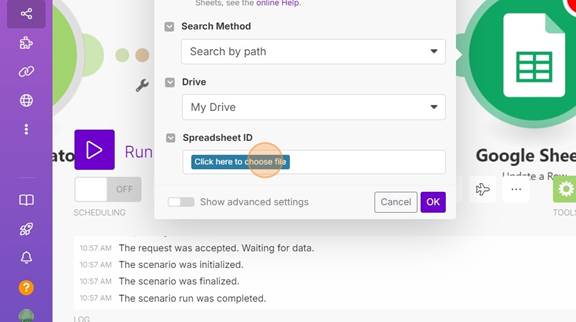
2. Enter the Spreadsheet and sheet name like you did in a previous step. It needs to be the original spreadsheet, since we are updating a row in it.
3. Now it wants the row number we want to update. As we just added this row in a previous module, we can access that to determine which row needs to be updated. Click in the Row number field and from the sidebar look for the Google Sheets = Add a Row section and click on Row Number. What happens is that once we complete that module, Google returns the row number, which we can use in later modules like this one.
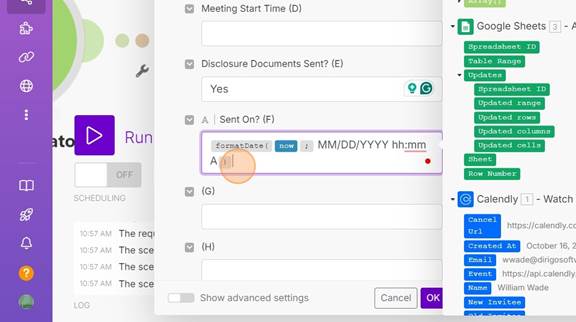
4. Next, we want to set Disclosure Documents Sent?. I just enter Yes in the textbox.
5. Now we want to set the date the document was sent. Click in the Sent On? textbox and when the sidebar shows up, we want to select the Date and time tab.
6. This gives us some built in functions to get the current date. Click on now. This uses the current date and time. Once that is selected we are going to format the date like we did in a previous step. Type in formatDate and an open parenthesis before now. After now type a semicolon followed by MM/DD/YYYY hh:mm A. After that add a closing parenthesis.
6. And that completes setting up the scenario. Click OK and then let’s test it out.
7. Click on the Run once button and set up an appointment in Calendly. You should see the scenario run and see the results in your Google sheet as well as get the disclosure documents.
Conclusion
Congratulations! You’ve just created a powerful automation that streamlines your document delivery process using Calendly and Make.com. Let’s recap what we’ve accomplished:
- Set up a Calendly trigger to initiate our workflow
- Created a system to log meeting requests in Google Sheets
- Automated the retrieval of disclosure documents from Google Drive
- Set up an email system to send documents automatically
- Implemented a method to track when documents are sent
By implementing this automation, you’ve taken a significant step towards improving your efficiency and professionalism. This workflow not only saves you time but also ensures that your clients receive important documents promptly and consistently.
Remember, the power of this automation lies in its ability to handle routine tasks, freeing you up to focus on more important aspects of your business, such as building relationships with clients and growing your practice.
Next Steps and Call to Action
Now that you’ve set up this automation, here are some next steps to consider:
- Test Thoroughly: Before rolling this out fully, conduct several test runs to ensure everything works as expected.
- Customize Your Email: Take some time to craft a personalized email template that aligns with your brand voice.
- Monitor and Refine: Keep an eye on how this automation performs over the next few weeks. Are there any areas that could be improved or refined?
- Explore More Automations: This is just the tip of the iceberg when it comes to what’s possible with Make.com and Calendly. Consider what other processes in your business could benefit from automation.
- Share Your Experience: We’d love to hear how this automation works for you! Leave a comment below sharing your experience or any creative modifications you’ve made to this workflow.
Have questions about this tutorial or ideas for future automation guides? Drop them in the comments below. Let’s continue the conversation and build a community of automation enthusiasts! Remember, in the world of business, efficiency is key. Start automating today and watch your productivity soar!